Platform Design
Updated October 18, 2017
This article applies to:
- Terrain 3D
- Terrain Forestry
- RoadEng Civil
- RoadEng Forestry
The Grading functions in Terrain are useful for designing polygonal shaped objects such pits, ponds and pads. It can also be used to design linear objects such as roads, channels and walls etc. although the RoadEng Location module is better suited for this purpose.
To illustrate the concepts of grading we will design a platform.
Grading Concepts
Platform Example
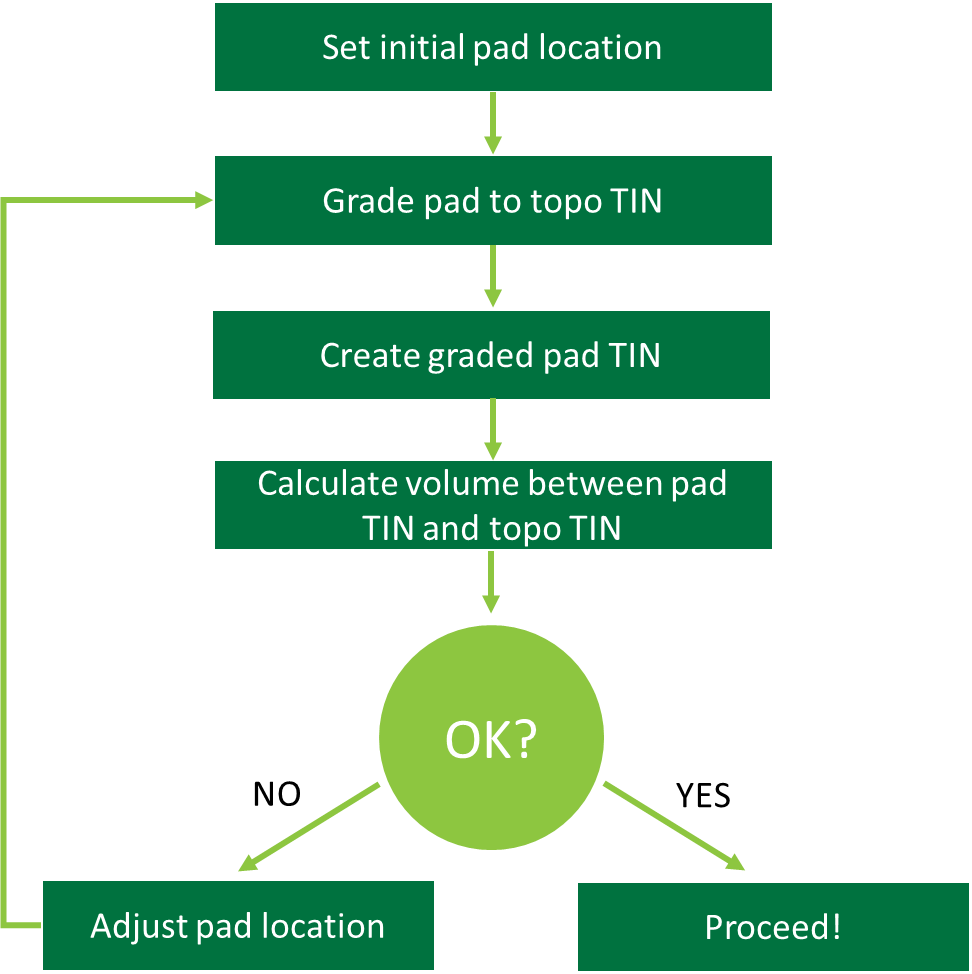
In this example, a platform outline (polygon) will be created using the mouse. We will then iteratively adjust the elevation of the pad to balance the cut and fill quantities.
Note: See Getting Started section for file install folders (<Terrain> and <Defaults and Layouts>)

Figure 1: Procedure for Balancing Cut and Fill
The following steps will demonstrate how to set the initial pad location by entering its coordinates. The initial pad location could also be established by drawing it with the mouse or importing it from an external file (shape, dxf etc.).
Before the pad is created we will place the topo contours (“OriginalGroundGrading.terx”) in the background for reference.
- In a blank Terrain file, bring in the original ground terrain file in the background: Plan | Plan Options | Background tab | Add… button and select <Terrain>\Grading\OriginalGroundGrading.terx. Press Open.
- Use Zoom Extents (View | Zoom Extents) or Pan the view if the background is not visible.
Now, we will draw in the pad for grading:
- Plan | New Feature, the Feature Properties dialogue box will appear. Type in the name “Platform” and keep the default properties (displayed, connected, elevations, modeled) as shown in the figure below.

Figure 2: Feature Properties Dialogue
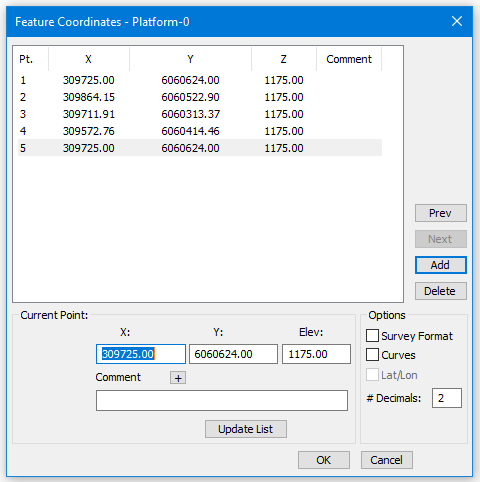
- Create a rectangular platform by adding coordinates: Press the Keyboard… button, and the Feature Coordinates dialogue box for the new feature called “Platform-0” will appear.
- Add the coordinates found in the figure below. Make sure not to press <Enter> after the last entry, instead press Update List. With Survey Format option unchecked, press OK.

Figure 3: Feature Coordinates Dialogue
This should result in a rectangle the same as the figure below:

Figure 4: Initial Pad Location Overlaid on Topo Contours