Merging Terrains
Updated May 08, 2025
This article applies to:
- Terrain 3D
- Terrain Forestry
- RoadEng Civil
- RoadEng Forestry
This Knowledge Base article is an excerpt from one of our tutorial files. The files referenced in the article, as well as the full tutorial document, are available in our Tutorial Installer.
The next few steps to will describe how to merge the pad with the OriginalGroundGrading file contours.
 File | Open <Terrain>\Grading\OriginalGroundGrading.terx A contour file will appear on your screen.
Next, we will merge the pad terrain into this terrain file. Terrain Modeling | Merge Terrain.

Figure 1: Merge Surface
Before continuing, make sure that the slope stakes on the pad form a distinct boundary. This is done by pressing the Options… button and check Include inside stitching (source) breakline in the TIN Merge Options dialogue box as in the figure below. Press OK twice.

Figure 2: TIN Merge Options
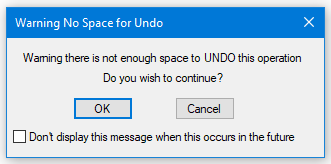
Press the Browse… button. Select <Terrain>\Grading\ pad-grading after volume calc.terx. A “Warning No Space for Undo” message box may pop up (figure below). Press OK to continue.

Figure 3: Warning No Space for Undo Dialogue Box
After a few seconds, the screen should now look like the figure below. Notice that the pad is now merged into the original ground surface.

Figure 4: Platform Merged into OriginalGroundGrading.terx
Terrain Modeling | Generate TIN. Set the parameters as shown in the Terrain Calculation dialogue box below and press OK to re-triangulate the surface.

Figure 5: Terrain Calculation Dialogue Box
To view the platform file merged into the OrignalGroundGrarding.ter contours let us look at it in 3D. View | New Window | 3D from dropdown menu. Rotate as required and you can see that the two files have been merged.

Figure 6: 3D Image of Merged Files (Platform.terx and OriginalGroundGrading.terx)
 File | New. Do not save changes.