Labels
Updated May 08, 2025
This article applies to:
- Terrain 3D
- Terrain Forestry
- RoadEng Civil
- RoadEng Forestry
This Knowledge Base article is an excerpt from one of our tutorial files. The files referenced in the article, as well as the full tutorial document, are available in our Tutorial Installer.
There are two types of labels used in the Terrain Module, Feature Labels and Floating Labels.
-
Feature Labels are labels associated with a feature. Elevation, Azimuth, and Distance are all examples of automatic labels. Point or feature attributes such as Comments, Date, Point Numbers etc. are Feature Labels. Whenever a feature is edited or deleted feature labels are modified accordingly.
-
Floating Labels are simply user-defined text. They do not depend on any feature and can be placed anywhere and modified directly.
The default characteristics (position, font, size, orientation etc.) for each label class is controlled by window type (Plan, Profile etc.). For the Plan Window, these defaults are set in menu Plan | Labels.
-
 File | Open <Terrain>\ CAD\park map.terx, or continue from previous example.
 -
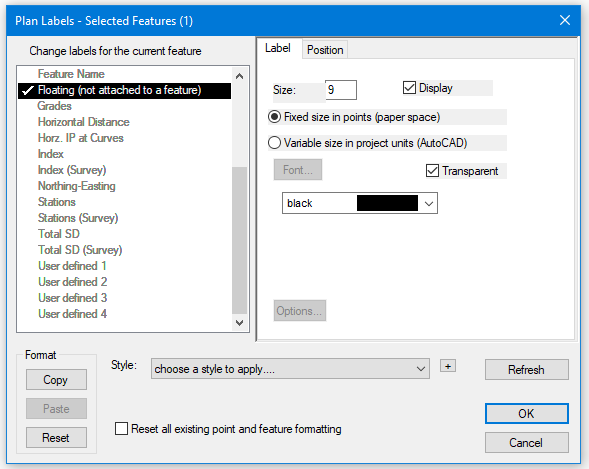
Plan | Labels. Turn on Floating (not attached to a feature) by double-clicking on Floating Labels (not attached to a feature) and check the Display box.

Figure 1: Plan Window Options- Default Label Format
-
Press OK to return to the main screen. The Plan Window will now look like figure below:

Figure 2: Plan Window with Floating Labels
It is often useful to override the default label positioning for individual features.
For instance, you may wish to turn on or off a certain class of labels for a specific feature. Label control of individual features is done using Feature Tools | Labels. We will use this function to turn off the labels in our boundary:
-
Highlight the park boundary with the Selection
 cursor.
 -
Feature Tools | Labels. Turn off the display of Comments (at feature points), double-click in the list box or turning off the check box adjacent to Display.
-
Click the Refresh button. Press OK. We will now add a floating label to our park map.
-
Home | Tool Selection | Edit Labels with Mouse from dropdown.
-
With the
 cursor click on upper left corner of the map and enter the text ("Park Boundary"). See figure below:

Figure 3: Plan Window Feature Formatting Dialogue Box
![]() Note: The
Note: The ![]() is referred to as the Orientation handle and the , is referred to as the Position Handle.
is referred to as the Orientation handle and the , is referred to as the Position Handle.
To move the position of a label, move the cursor over the Position Handle (or any part of the label). Left-click and drag the label to a new location and release.
To rotate a label, move the cursor over the Orientation Handle. Left-click and pivot the label to the preferred position and release the left mouse when in the correct position.