Best Practices for Managing Project Files in Shared Storage Environments
Updated July 13, 2026
This article applies to:
- Terrain 3D
- Terrain Forestry
- RoadEng Civil
- RoadEng Forestry
- Softree Optimal
Overview
Project files can be stored in a variety of centralized storage solutions, including cloud-based document management systems, engineering data management platforms, and network file servers. While these systems provide excellent collaboration and backup capabilities, they are not always the best location to actively edit project files.
This article outlines the recommended workflow for managing project files while minimizing the risk of file corruption and maintaining optimal software performance.
Recommended Workflow
For the best experience, follow this workflow:
- Store your project files in your organization's centralized storage system.
- Download or copy the project files to a local drive before opening them in the software.
- Perform all editing and save your work locally.
- Once you have finished working, copy or synchronize the updated files back to the centralized storage location.
This approach combines the benefits of centralized document management with the reliability of local file operations.
Why Work Locally?
Working with project files on a local drive offers several advantages.
-
Improve Performance
Reading from and writing to a local drive is generally faster than accessing files over a network or cloud storage. Working locally can improve overall application responsiveness, especially when working with large or complex projects.
- Reduce the Risk of Interrumped Saves.
Saving directly to a network or cloud location relies on a stable connection. If the connection is interrupted during the save process, the file may not be written successfully. Saving locally reduces dependence on network connectivity while you work.
-
Support Centralized File Management
Maintaining project files in a centralized storage system ensures that:- Team members can access the latest project files.
- Projects can be handed over more easily.
- Data is protected through the organization's backup and document management processes.
- Project information is not dependent on an individual user's computer.
Defaults and Layouts Folder
RoadEng's defaults and layouts folder can be found in the path shown below:
C:\ProgramData\Softree\<Product><version>\
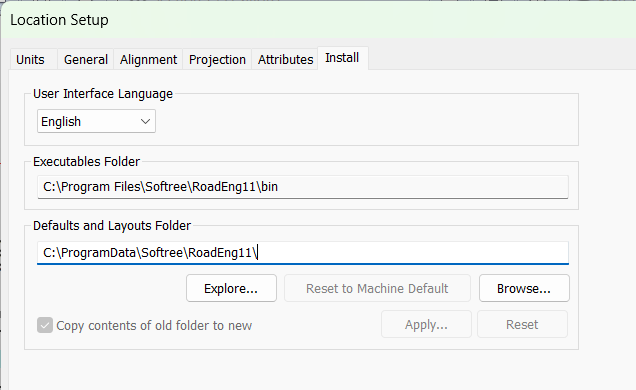
Figure 1 - Install tab in the Setup dialog box
Press the Explore button to open the Defaults and Layouts folder in Windows Explorer. If you want to change the location of this folder; type F1 for help to see the details.
Moving Defaults Files and Other Possible Actions
Softree does not recommend any particular action but here are some possibilities:
- Back up these files.
- Copy these files from an existing computer to a new computer containing a fresh install of RoadEng/Terrain.
- Copy files from a previous version and then install to a newer version.
- Synchronize some of these files with a shared network location.
- Write protect some key files.
- Change the folder location to a shared drive (advanced).
File Types
It is beyond the scope of this article to define all the files in the Defaults and Layouts folder; however, below are a few examples.
- Softree.ini contains default settings for all modules, in addition any file named Normal is a default that is used when starting a new project.
- Screen layout and multiplot layout (MLT, SLT, ILT, DLT, CLT and BLT).
- Template table (TPL).
- Ground types table (GDX).
- Terrain Import/Export formats (IOP).
- Cable analysis (DLines.prm).
- Location curve tables (TBL).
- Line types and symbols (TRF).
When you save your Terrain/Location file the current Defaults and Layouts files will be automatically stored by closing the software.