Display and Reporting of Template Layers
Updated November 07, 2023
This article applies to:
- RoadEng Civil
- RoadEng Forestry
Formatting Template Layers
Note: Refer to Getting Started section for file install folders (<RoadEngCivil> and <Defaults and Layouts>).
 File | Open <RoadEngCivil>\Location2\bluff_road.dsnx.
- Maximize the Section window and zoom in.
- Right click in the Section window and choose Section Options…
- Click on the
button beside the Template check box to open the Template Display Format dialog box (Figure 20‑3).

Figure 1: Section Window Options and The Template Display Format Dialog
- Select the first item (SG – Subgrade material) and set the Display Labels check box (as shown above).
- Select each of the other layers and note that Display Labels is not checked. Only template items from the Subgrade layer will display labels.
- In the Labels section on the left-side of the dialogue box, press the Format… button.

Figure 2: Label Selection and Formatting Dialog Box
- Ensure that only Point Codes labels are displayed as shown in the figure below. You can also change label font, color and position in this dialogue box. Press OK to close the dialog box.
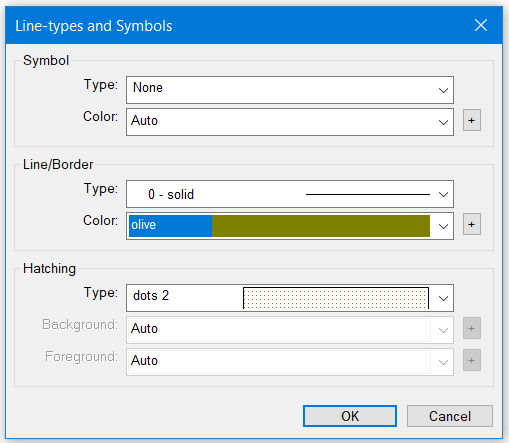
- Back in the Template Display Format dialogue, press the Linetypes… button on the right-hand side to open the Line-types and Symbols dialog box (Figure 20‑5).

Figure 3: The Line-types and Symbols Dialog Box Allows the user
to Change Line Style (including symbols), Hatch Style and Color
- Change the color of the subgrade to olive (figure above) and press OK to accept changes and close the dialog box.
- Press OK to return to Section Window Options.
- Ensure the Labels check box is checked; our code labels will not display unless we turn on this master switch.
- Press OK to return to the main screen.
You should see the template point code labels for the subgrade surface (Figure 20‑6).
Note: The template layer formatting that we have modified in the exercise is stored in Screen Layouts. This includes line style, hatch style, color and label formatting for subgrade and each layer above subgrade.
- Move your mouse over a template point that is not displayed (for example the shoulder edge) and hold your mouse there (hover). You will see a tool tip displaying the point code along with some other information (Figure 20‑6).

Figure 4: Hover Tips in The Section Window
- Try hovering in other places and see what information appears in the tip. You can display:
- Mouse elevation, vertical and horizontal offsets
- Cut and fill material
- Cross sectional areas
- Template leg length and slope
- Point codes
- Right click in the ditch cut area (above the ditch bottom and below the original ground) and select Hatch Cut Area for SG from the menu. This shows the olive hatching you defined above.
- Right click in the same place to turn off the subgrade hatching.