Creating a Profile from a Traverse
Updated May 08, 2025
This article applies to:
- Terrain 3D
- Terrain Forestry
- RoadEng Civil
- RoadEng Forestry
This Knowledge Base article is an excerpt from one of our tutorial files. The files referenced in the article, as well as the full tutorial document, are available in our Tutorial Installer.
Road Design Example
A traverse document has been entered into the Survey/Map Module. This example will demonstrate how to display a profile of the traverse.
Note: See Getting Started section for file install folders (<Terrain> and <Defaults and Layouts>)
-
View| Retrieve Screen Layout <Defaults and Layouts>\Training\training terrain profile.ilt. This screen layout has Scroll Bars, TIN, Labels, Grid, North Arrow and Background enabled.
-
Home | Insert File. From the Files of Type pull-down choose Softree Traverse Document (*.TR1,*.DB1). Select <Terrain>\Survey\road.tr1. Press Open.

Figure 1: Insert File – Softree Traverse Document
-
Press OK to bypass the Import Options dialogue box.
-
Display the profile: View | New Window | Profile from drop down menu.
-
Profile | Profile Options. Change Ratio (V to H) to 10.0. OK.

Figure 2: Profile of a Survey/Map Traverse Document

Figure 3: Profile of a Survey/Map Traverse Document
-
The scale has automatically been set to fit the entire traverse into the Profile Window. To change the scale: activate the Profile Window. Profile | Profile Options as shown in the figure below:

Figure 4: Profile Window Options Dialogue
-
De-select Auto Scale. Set the Horizontal scale to 4000, the Vertical scale to 400 as shown above. Press OK.
-
At this point the Profile Window may be blank. Press the <Ctrl + N> key; the traverse should come into view.
Note: The <Ctrl + N> and <Ctrl + B> keys will change the current point (N=Next and B=Back).
-
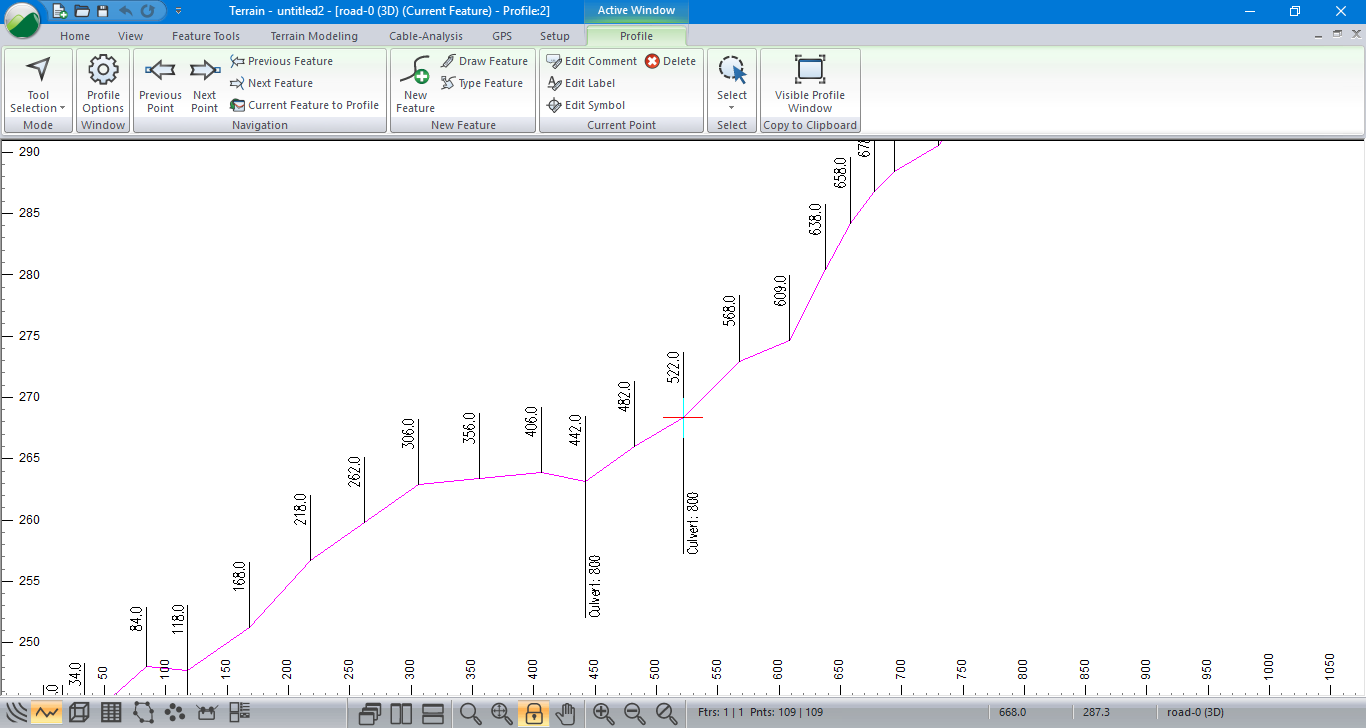
To examine the profile near the proposed culvert at station 522 (the grid numbers in the X axis correspond with the stations). Using <Ctrl + N> and <Ctrl + B> move the current point to station 522 (as shown below). You can also use Previous Point and Next Point buttons in the Profile tab.

Figure 5: Profile with Current Station at 522
-
To display the station numbers: Profile | Profile Options. Press the plus button
next to Labels. Double click to select Stations. Press OK to return to main screen. The Station numbers are now displayed.

Figure 6: Traverse Profile with Station Numbers Displayed
-
 File | New. Do not save changes.