Checking Areas and Volumes
Updated November 30, 2017
This article applies to:
- RoadEng Civil
- RoadEng Forestry
There are several visual aids available to verify cross sectional areas and volumes. This section will explore hatching areas and the information available in hover tips.
If you are continuing from the previous section, Change your cursor back to Select Tool and start at step 2.
-
Start the Location module.
 File | Open <RoadEngCivil>\As-Built \PartC.dsnx.
 In the section window: Right click | Section Options…
-
In the Section Options dialogue box, click on the
button beside Template to activate the Template Display Format dialogue (Figure 25‑8).

Figure 1: Template Display Format Dialogue
Set the Hatch Cut Areas check box for each of the three material surfaces.
Note: You can control the color, line type and hatch of the selected material by clicking on the Format… button in Template Display Format dialogue box.
Press OK twice to return to the main screen.

Figure 2: Section Window with Cut Areas Hatched
Note the hatched areas correspond to the areas used for volume calculations.
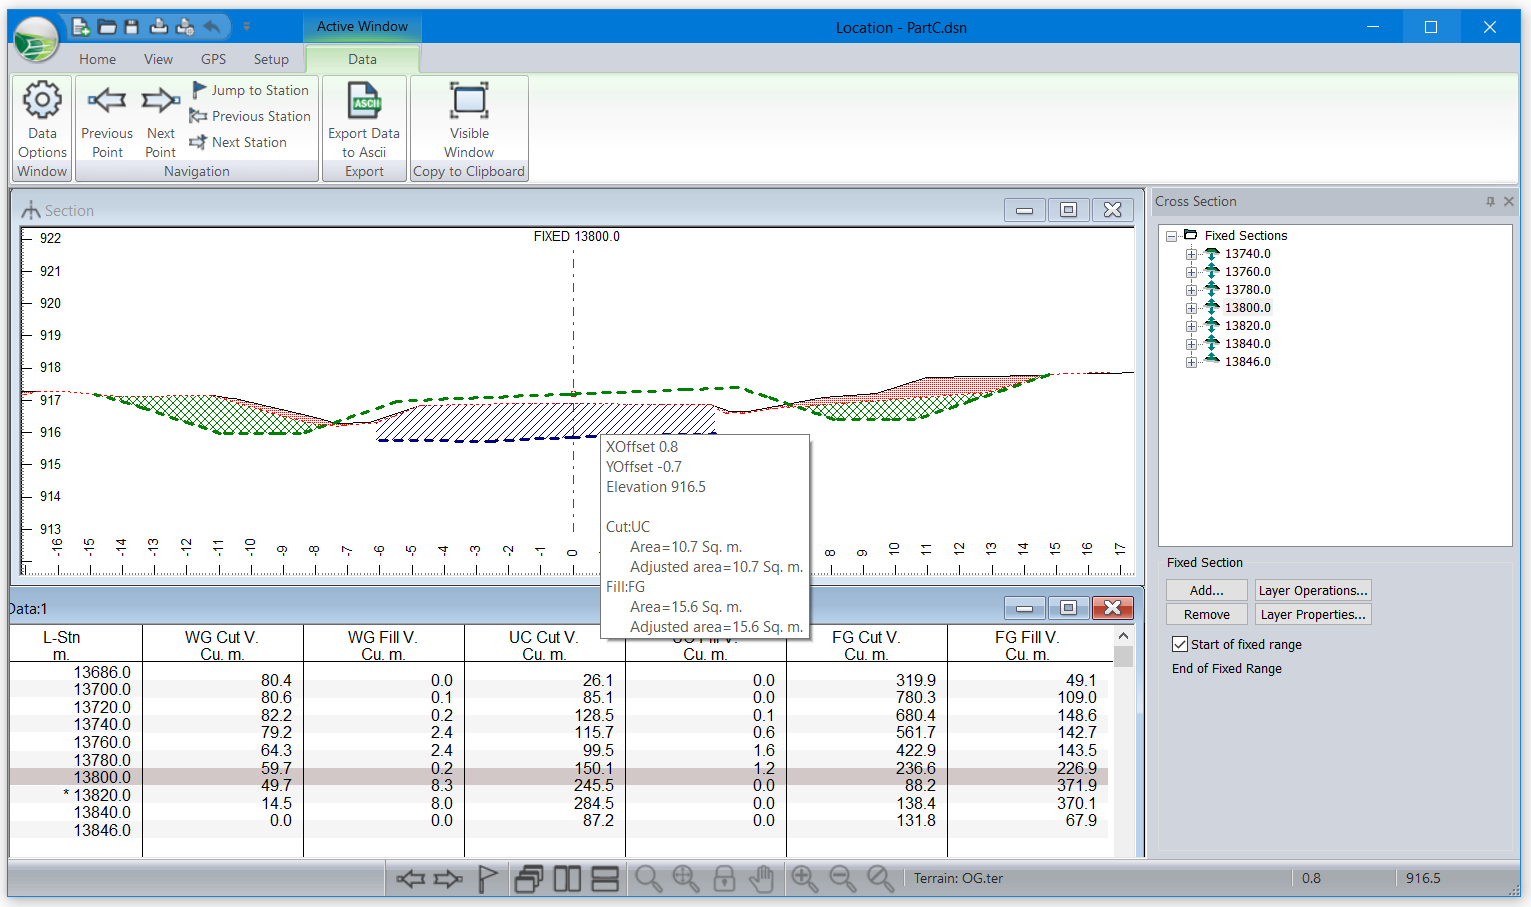
In the section window, hover your cursor over one of the cut areas.

Figure 3: Section Window Hover Tip Depicting Cut and Fill Areas
The hover tip shown in the figure above indicates the position of the cursor with respect to the centerline as well as cut and fill information. You may want to try turning on fill hatching to see how the final grade is filled after the sub cut is extracted.
Note: Right click in the Section window and notice the hatching options at the bottom of the context menu. The layers available for hatching cut or fill depend on where you click.
Fixed Ranges
Fixed Sections divide the alignment into fixed ranges for calculation and reporting. A fixed range starts at a fixed cross section with the Start of Fixed Range property set (figure below right) and extends to the next fixed cross section. In the range between these two fixed sections no other cross sections are calculated – the volumes are calculated from the fixed section end areas only.
If a fixed section does not have the Start of Fixed Range property box checked off (see below), then all the cross sections between the two fixed sections will follow the original template—the average volume between them will not be calculated.

Figure 4: Fixed Sections and Intermediate Reporting Points
Note: When the Start of Range property is set on a fixed section, volumes are calculated from the average end areas of this fixed cross sections and the one following. Design points in between are ignored.
The Section Editor tree-control indicates the ranges with arrows in the layer icons and by the state of the Start of fixed range and End of fixed range check boxes.
In this example, the 100 m range from station 13740 to 13840 is fixed.
 File | Close. Do not save changes.