Working with a GPS Device
Updated October 17, 2017
This article applies to:
- Terrain 3D
- Terrain Forestry
- RoadEng Civil
- RoadEng Forestry
GPS coordinates can be incorporated into Survey/Map, either by directly attaching a GPS or by entering coordinates. Traditional survey methods (bearing, distance and slope) can be combined with GPS in several ways to improve accuracy and productivity. The following examples illustrate ways to combine GPS data with conventional surveys:
Note: See Getting Started section for file install folders (<SurveyMap> and <Defaults and Layouts>)
Tying to known GPS benchmark(s). This is done either in the field or in the office using the Traverse | Get/Set XYZ

Figure 1: Get/Set Coordinates Dialogue
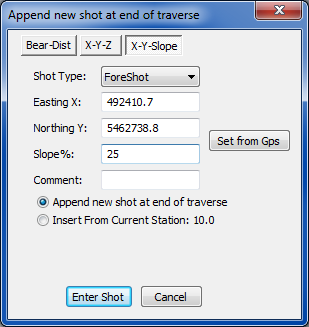
XY from GPS, Z from slope. This is done using the Traverse | Insert Shot dialogue, X-Y-Slope. XY coordinates are taken from the GPS and the slope % (or similar measure of vertical angle) is entered.

Figure 2: XY From GPS Combined with Slope Angle
XYZ from GPS. This is done using the Station | Insert Shot dialogue, X-Y-Z. XYZ coordinates are taken from the GPS.

Figure 3: XYZ from GPS
Configuring a GPS Device
Before going out in the field with Survey/Map it is important to make sure your GPS device is properly configured.
Identify the Connection Type (either Serial or USB):
Survey/Map supports Garmin devices in either a serial (RS232) connection or a direct USB connection. The connection type can be determined by how the cable plugs into the Garmin device. If the cable plugs into a round Garmin-type connector on the back of the GPS unit, then it is a serial connection. If the cable plugs into a standard USB connector on the back of the GPS unit (same plug type as on digital cameras), then it is a USB connection.
Set the Device Mode (either NMEA or Garmin):
USB Garmin devices only communicate in Garmin proprietary mode. For some reason, the newer Garmin USB devices do not support the industry standard NMEA mode. Set USB Garmin devices to Garmin Data Format on the Interface - Settings page of the GPS unit.
Serial Garmin devices communicate using serial (RS232) protocol, however most laptops only support USB ports. This means you may require a serial to USB adapter cable to connect your GPS to Survey/Map. Specifications for the serial interface are included in Appendix B – GPS Hardware Configuration. Set Serial Garmin devices to NMEA Data Format on the Interface - Settings page of the GPS unit.
Test your GPS device
- Connect the GPS to the laptop using either a Serial or USB cable and turn on your GPS device.
- Start Survey/Map and choose GPS/Laser | Connect.
Survey/Map should automatically detect the GPS device. The GPS Confirmation Dialogue will appear showing the connection information.

Figure 4: GPS Auto-Detect Confirmation
Survey/Map should now be connected and ready to track GPS coordinates. Try moving the GPS device near a window or taking it outside. When the GPS has enough satellites the red indicator on the tool bar should turn to green.

Figure 5: GPS Tracking Indicator
If the GPS device is not found, check to make sure you have the GPS in the correct mode (NMEA mode for serial connections or Garmin mode for USB connections) and that the cables are connected correctly.